Discover amazing discounts on sewing patterns-Fabric-Doll CLothes-eBooks-Yarn-& Other Handmades!
DIY Cozy Round Pet Bed + Matching Blanket (Warm, Washable & Easy to Sew)
Learn how to sew a cozy round pet bed using fleece, flannel, cotton, and canvas, with batting and stuffing, plus a matching pet blanket.
DIY SEWING
Rhonda Harris
2/5/20264 min read
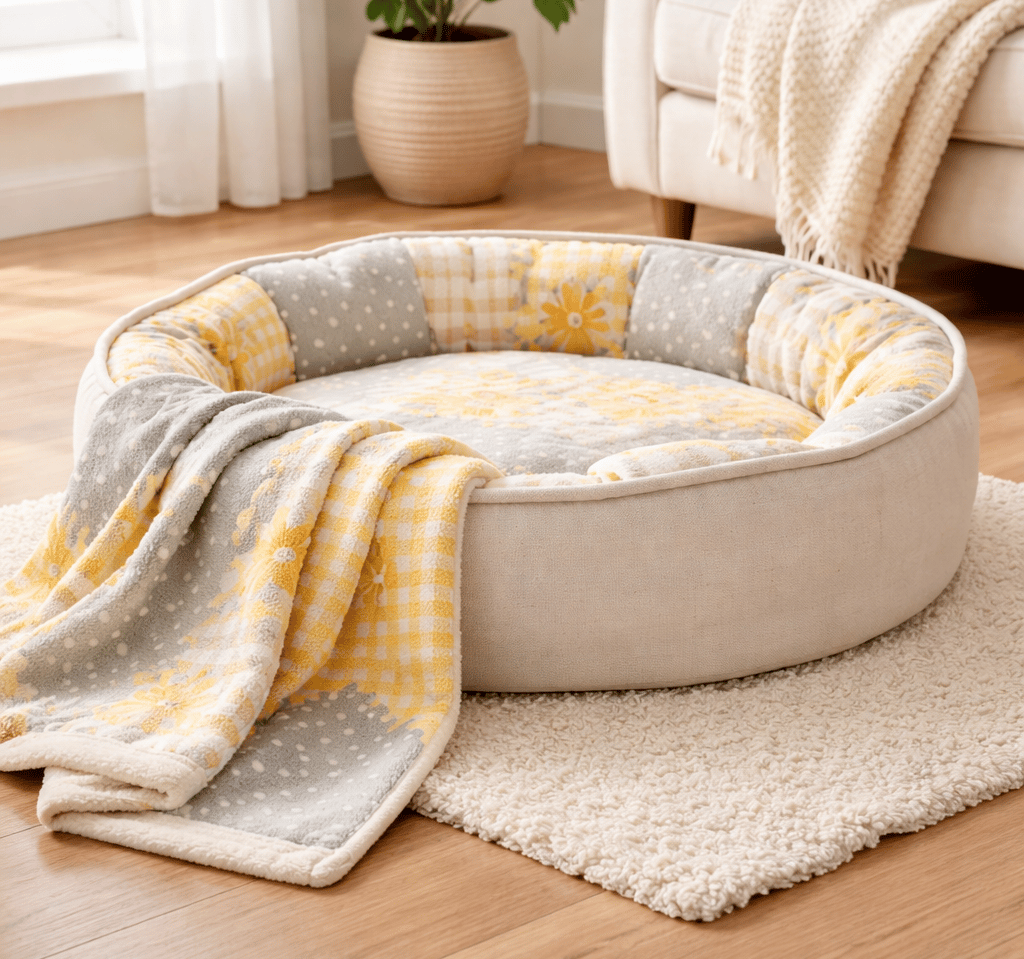
Sew your pet a soft, durable round bed using fleece, flannel, cotton, canvas, and other soft woven fabrics — plus a matching blanket for extra warmth.
If you’re looking for a sewing project that is useful every single day, this DIY round pet bed is one of the best things you can make.
Store-bought pet beds often go flat, tear easily, or aren’t truly washable. This homemade version is designed to be:
Soft enough for napping.
Warm for winter and cool evenings
Durable for claws and digging
Washable and easy to refresh
Customizable with fabrics you already own
Plus, we’ll make a matching pet blanket to go with it — because pets love something extra to snuggle into!
Why a Round Pet Bed Is the Best Shape
Round pet beds create a “nest” effect.
Most pets naturally curl up when resting, so a circle shape gives them:
A cozy boundary to lean against
More warmth (less open corners)
A secure, snuggly feel
Best Fabrics for a DIY Pet Bed
This project works best when you combine one soft fabric + one durable fabric.
Soft top fabric (sleeping surface)
Choose:
Fleece (anti-pill is best)
Flannel
Soft cotton woven fabric
Quilting cotton (works best with batting underneath)
Strong bottom fabric (base)
Choose:
Canvas (excellent choice)
Cotton duck cloth
Denim
Upholstery fabric (soft woven)
Fabrics to avoid
Loose knits that stretch too much
Fragile fabrics that snag easily
Slippery satin-like fabric
Best Fill Options for Comfort & Warmth
This bed uses batting + stuffing, which helps it stay warm and cushioned.
Stuffing choices (use one or mix)
Poly-fil stuffing
Shredded foam (most comfortable!)
Batting scraps (great use of leftovers)
Old clean blanket pieces cut into strips
Tip: If you want raised sides, use more stuffing near the edges and less in the center.
DIY ROUND PET BED TUTORIAL
Skill Level
Confident beginner
Time Needed
About 1–2 hours
Step 1: Choose Your Pet Bed Size
Pick a diameter based on your pet.
Small (cats + toy dogs)
Diameter: 20 inches
Side height: 4 inches
Medium (small–medium dogs)
Diameter: 26 inches
Side height: 5 inches
Large (larger dogs)
Diameter: 32 inches
Side height: 6 inches
Step 2: How to Draw a Perfect Circle (No Pattern Needed)
No pet bed pattern required!
Here are 2 easy methods:
Method A: Trace a round object
Use a:
Large pot lid
Serving tray
Round tabletop
Laundry basket rim
Method B: String + pencil compass method
Tie a string to a pencil
Measure the string to the circle radius (diameter ÷ 2)
Hold the string center in place
Draw your circle around
Example:
For a 26" bed → radius = 13"
Step 3: Cut Your Fabric Pieces
Cut these pieces:
A) Top Circle (soft fabric)
Cut 1 circle from fleece/flannel/cotton
Diameter = bed size chosen
B) Bottom Circle (durable fabric)
Cut 1 circle from canvas/duck cloth/denim
Same diameter as the top
C) Batting Circles
Cut 1–2 circles of batting
Same diameter
D) Side Wall Strip (makes the bed 3D)
This strip creates the “bowl” of the bed.
Strip width
= side height + seam allowances
Example: 5" side height → cut strip width 6"
Strip length
= circle circumference
Use this formula:
Circumference = 3.14 × diameter
Add 1 extra inch for seam allowance.
Examples:
20" diameter → 3.14×20 = 62.8" → cut 64"
26" diameter → 3.14×26 = 81.6" → cut 83"
32" diameter → 3.14×32 = 100.5" → cut 102"
If your fabric isn’t long enough, sew multiple strips together end-to-end.
Step 4: Sew the Side Strip into a Loop
Fold the side strip with right sides together and stitch the short ends.
Now you have a fabric ring.
Press seam open.
Step 5: Sew the Side Ring to the Bottom Circle
This step creates the real pet bed shape.
Pin or clip the side ring to the bottom circle (right sides together)
Match the seam of the ring to any point on the circle
Sew around with a ½" seam allowance
Important trick for sewing curves
To prevent puckers, snip the seam allowance of the side ring:
Cut small snips every 1"–2"
Do not cut through the stitch line
This helps the fabric curve smoothly around the circle.
Step 6: Quilt the Top Circle (Optional but Recommended)
If you want the bed to stay fluffy longer, quilt the top circle.
Layer:
Top fabric circle (right side up)
Batting circle underneath
Stitch a few lines across:
Straight lines
Large spiral
Simple grid
This keeps batting from shifting after washing.
Step 7: Attach the Top Circle
Now clip the top circle to the open edge of the side ring.
Right sides together
Sew around with ½" seam allowance
Leave a 6"–8" opening for turning and stuffing
Step 8: Turn the Bed Right Side Out
Turn the bed through the opening.
Smooth out the circle and seams.
Step 9: Stuff the Bed for Comfort & Raised Sides
Stuff the bed firmly.
For the best shape:
Stuff the outer edges more heavily to form bolsters
Keep the center slightly softer for sleeping
Tip: Roll batting scraps into “logs” and push them into the outer edge first. Then fill with Poly-fil to finish.
Step 10: Close the Opening
Fold the raw edges inward and stitch closed using:
A tight straight stitch
Or a ladder stitch by hand
Topstitch around the edge for a finished look.
Matching DIY Pet Blanket Tutorial
A pet blanket makes the bed extra cozy and protects furniture, car seats, and crate floors.
Blanket Size Ideas
Small: 20"–30"
Medium: 30"–40"
Large: 40"–55"
Blanket Option 1: Sewn Reversible Blanket (Recommended)
Cut:
1 fleece or flannel rectangle
1 cotton or flannel rectangle
Optional: 1 batting layer inside
Instructions:
Sew right sides together
Leave a turning opening
Turn the right side out
Topstitch around edges
Quilt a few lines across the blanket if using batting.
Blanket Option 2: Fast No-Sew Fleece Blanket
Cut fleece to your preferred size and round the corners.
Optional:
Cut fringe around the edge and tie knots
or leave raw edges (fleece doesn’t fray)
Washing & Care Tips
To keep your handmade pet bed fresh:
Machine wash cold or warm
Tumble dry low
Shake and fluff between washes
Tip: Use a lint roller or a vacuum hose to remove pet hair before washing.
This DIY round pet bed is one of those sewing projects that never goes to waste. It’s practical, warm, and easy to customize with fabric scraps — and your pets will love it.
You can also sew these beds as:
Holiday gifts
Shelter donations
Handmade items to sell
If you enjoyed this tutorial, be sure to visit my sewing shop for sewing patterns, project ideas, and sewing inspiration for everyday life
Curated Sewing Goods Online – Based in the USA
Reach Out Contact Me
rhonda@theneedlemarket.com
Proudly powered by Hostinger
Start your own site with Hostinger

