Discover amazing discounts on sewing patterns-Fabric-Doll CLothes-eBooks-Yarn-& Other Handmades!
DIY Fabric Bowl & Mug Warmers: Easy Insulated Sewing Projects for Everyday Comfort
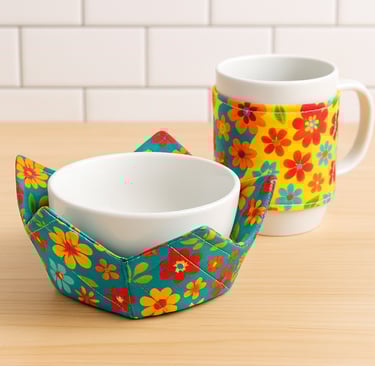
Learn how to sew a DIY fabric bowl warmer and mug cozy using cotton fabrics. Easy, beginner-friendly projects to keep soups and drinks warm.
DIY SEWING
Rhonda Harris
12/5/20252 min read

Keep Your Soups, Stews, Coffee & Tea Warmer—Without a Pattern
When chilly days arrive, nothing feels better than a warm bowl of soup or a steaming mug of coffee. But soups cool quickly, and mugs lose heat fast. The solution? DIY fabric bowl warmers and mug warmers—simple sewing projects that insulate heat naturally and protect your hands, all without using a pattern.
These warmers are inexpensive to create, beginner-friendly, and perfect for using up your fabric stash. They also make excellent gifts, craft-fair items, or additions to your handmade kitchen collection.
Why Make Your Own Bowl & Mug Warmers?
✔ Perfect for reheating: You can safely place 100% cotton bowl warmers in the microwave to heat your food.
✔ Protects your hands: No more burning fingers when lifting hot bowls, plates, or mugs.
✔ Great stash busters: Use scraps, fat quarters, or leftover cotton batting.
✔ Cost-effective: Avoid buying expensive store versions—make your own in your favorite prints.
✔ Customizable: Choose seasonal fabrics, modern prints, farmhouse neutrals, or bright colors.
How to Sew a DIY Fabric Bowl Warmer
Materials Needed
Two 10"–12" squares of 100% cotton fabric
Two 10"–12" squares of 100% cotton batting (microwave-safe)
Cotton thread
Sewing clips or pins
Scissors or rotary cutter
Sewing machine
Iron
Instructions
1. Create Your Fabric Sandwich
Place one fabric square right-side down. Add a batting square. Repeat with the other set. Quilt each pair with simple straight lines or diagonal lines to keep batting smooth.
2. Mark and Sew the Darts
Fold each quilted square in half, then mark a 1" dart on both sides. Sew the darts. Repeat for all four corners.
This is what gives your bowl warmer its soft “bowl shape.”
3. Join Both Pieces
Place quilted pieces right sides together. Clip or pin all around.
Sew with a ¼" seam allowance, leaving a 3" opening to turn.
4. Turn & Topstitch
Turn right-side out, poke out the corners, press, and topstitch the entire edge.
Your bowl warmer is now ready for soups, snacks, or microwaving.
How to Sew a DIY Mug Warmer (Reusable Coffee Cozy)
Materials Needed
One 100% cotton fabric rectangle (5" x 11")
One cotton batting rectangle (same size)
Elastic loop OR a button & loop closure
Velcro (optional)
Sewing machine & cotton thread
Iron
Instructions
1. Layer the Fabric
Place the fabric rectangle right-side down, batting on top, and fold lengthwise right-sides together.
2. Sew the Edges
Sew around with ¼" seam allowance, leaving a small opening.
Turn right-side out and press flat.
3. Add Closure
You can choose:
Elastic loop + button
Velcro for adjustable fit
Snap button for a clean finish
4. Topstitch Around
Topstitch all the way around for strength and stability.
Wrap around your mug, secure the closure—and enjoy a warmer drink longer.
Tips for Success
Always use 100% cotton materials if you plan to microwave the bowl warmers.
Avoid polyester thread or batting—they can melt.
Add decorative quilting to elevate the look.
Matching sets (bowl + mug warmers) make great handmade gifts.
Would you be interested in more sewing ideas, patterns, and DIY tutorials?👉 Shop The Needle Market for sewing patterns, fabric, and yarn: https://www.theneedlemarket.com and https://theneedlemarket.shop You will also find more tutorials and DIY projects at www.thedesignersneedle.com!
Did you find this article helpful and informative by chance? If you did, feel free to subscribe to The Needle Market below in the footer and receive articles like this delivered right to your inbox!
Curated Sewing Goods Online – Based in the USA
Reach Out Contact Me
rhonda@theneedlemarket.com
Proudly powered by Hostinger
Start your own site with Hostinger

