Discover amazing discounts on sewing patterns-Fabric-Doll CLothes-eBooks-Yarn-& Other Handmades!
DIY Open-Front Cardigan Tutorial: Short, Hip-Length & Long (No Buttons)
Sew an easy open-front DIY cardigan with no buttons in three lengths—short, hip-length, or long—using knit fabric and optional piping for a polished finish.
DIY SEWING
Rhonda Harris
2/10/20264 min read
Step-by-step instructions for sewing short, hip-length, and long open-front cardigans with clean lines, comfortable knit fabrics, and a timeless layering style.
An open-front cardigan is one of the most useful garments you can sew. It layers over tanks, tees, blouses, and dresses, and because there are no buttons, the fit is forgiving, and the construction is simple. In this tutorial, you’ll learn one straightforward method you can use to make a short cardigan, a hip-length everyday cardigan, or a long cardigan/duster — all using the same steps.
Best Fabrics for This Project
Choose a knit that drapes and feels comfortable:
Sweater knit (stable and cozy)
French terry (casual, easy to sew)
Ponte knit (more structured, polished)
Rayon jersey (soft drape, lightweight)
Lightweight fleece (warm, casual)
Tip: If your knit is very stretchy or “bouncy,” plan to stabilize shoulder seams so the cardigan doesn’t grow while you wear it.
What You’ll Need
Knit fabric (yardage guide below)
Matching thread
Stretch needle (ballpoint or jersey needle)
Sewing machine that can do a zigzag or stretch stitch (or serger)
Scissors or rotary cutter + mat
Pins or clips
Measuring tape
Optional: beige piping (for a subtle contrast detail)
Optional: fusible knit stay tape (for shoulder seams)
Yardage Guide (Approximate)
These amounts assume 58–60" wide knit fabric.
Short (cropped): 1 to 1.5 yards
Hip-length: 1.5 to 2 yards
Long (duster): 2.5 to 3 yards
If you’re adding longer sleeves, a wider band, or making a plus-size, add a little extra.
Quick Fit Notes (Before You Cut)
This style is meant to be relaxed, not tight.
The front is intentionally open — no overlap needed unless you want a dramatic wrap look.
Length is the main difference between the three versions.
Step-by-Step DIY Cardigan Instructions
Step 1: Take a Few Key Measurements
Measure over the clothing you’ll wear under the cardigan.
Bust (around the fullest part)
Hip (around the fullest part)
Back neck to desired hem (choose short/hip/long)
Sleeve length (shoulder point to wrist)
Upper arm (around bicep)
Ease: Add 2–4 inches of ease to bust/hip for a relaxed cardigan.
Step 2: Create a Simple “No-Pattern” Cutting Plan
You’ll cut: Back (1 on fold), Fronts (2), Sleeves (2), Optional front band (2 long strips)
A) Back Piece (Cut 1 on fold)
Width: (Bust measurement + ease) ÷ 2
Length: your chosen length (short/hip/long)
Cut on the fold for a clean center back.
B) Front Pieces (Cut 2)
Use the back piece width as your guide.
Width of each front: about ½ of back width
Length: same as back
Neckline: scoop or shallow V (keep it simple)
Easy method: Lay your back piece down, trace it, then cut the front neckline lower and create a straight front edge.
Step 3: Choose Your Length (Short, Hip, or Long)
Short (Cropped)
Hem falls around upper waist.
Hip-Length
Hem lands at the hip bone or slightly below.
Long (Duster)
Hem lands around the mid-thigh to the knee area.
Tip: For maximum flattering lines, make the front edges hang straight rather than curve inward.
Step 4: Cut the Sleeves (2)
Cardigans can use set-in sleeves or easy drop-shoulder sleeves.
Easiest Sleeve (Drop-Shoulder)
Sleeve width: (Upper arm + 2") for comfort
Sleeve length: desired sleeve length
Shape: a gentle curve at the top edge (or keep it slightly squared for super-easy sewing)
If you’re unsure, cut sleeves slightly wider — you can always slim them later.
Step 5: Sew Shoulder Seams
Place front and back pieces right sides together.
Sew shoulder seams using:
a narrow zigzag, stretch stitch, or serger
Press seams gently (don’t stretch).
Optional: Add knit stay tape to shoulder seams before stitching to prevent stretching.
Step 6: Attach Sleeves
With cardigan body still inside-out, match the sleeve center to the shoulder seam.
Pin/clip sleeve into the armhole.
Sew sleeve to armhole.
Repeat for the other sleeve.
Step 7: Sew Side Seams + Underarm Seam
Fold cardigan with right sides together.
Sew from sleeve cuff down to hem in one continuous seam.
Repeat on the other side.
Step 8: Decide Your Front Finish
You have two clean options:
Option A: Simple Folded Edge (Fastest)
Fold the front edges inward ½"–¾"
Stitch with a stretch stitch or twin needle
Option B: Add a Front Band (Most Professional)
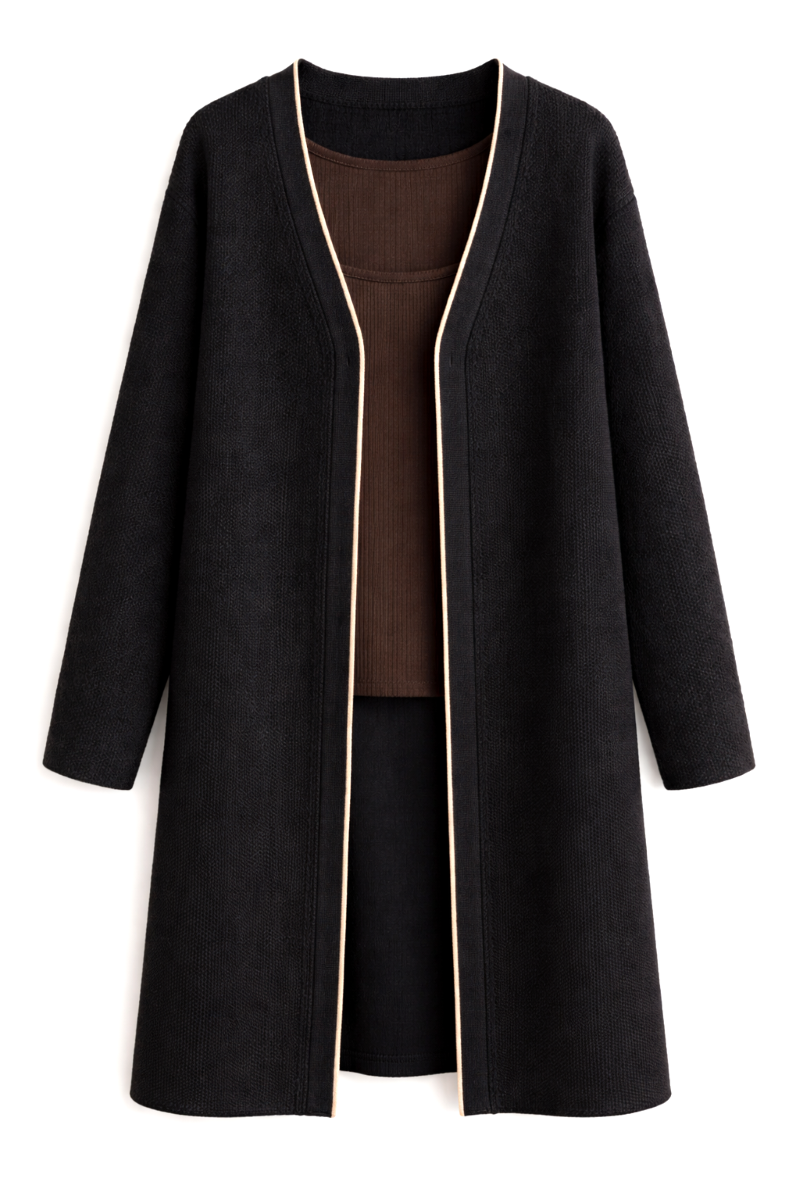
This gives the cardigan structure and is perfect for adding beige piping in the seam while keeping the band itself black.
How to Add a Black Front Band With Beige Piping in the Seam
Step 9: Cut the Band Pieces
Cut two long strips from black fabric:
Width: 3"–4" (for a finished band around 1.25"–1.75")
Length: measure from hem up the front edge, around the neckline, and down the other front edge.
Cut slightly longer; you can trim.
Step 10: Attach Piping to the Band (Optional but Beautiful)
Place piping along one long edge of the band strip.
Baste it in place close to the piping seam using a zipper foot.
Repeat for the second band strip if needed.
Step 11: Sew the Band to the Cardigan
With cardigan right side up, place the band right sides together along the front edge and neckline.
Stitch, catching the piping seam (zipper foot helps).
Press seam toward band.
Fold the band to the inside, enclosing the seam.
Topstitch on the inside edge (or stitch-in-the-ditch from the front for a clean look).
Now your band is black, and the piping shows as a thin beige line in the seam — exactly the look you described.
Step 12: Hem the Sleeves and Bottom
No cuffs
No hem band
Sew a clean hem:
Sleeve Hem
Fold up ¾"–1"
Stitch with stretch stitch or twin needle
Bottom Hem
Fold up 1"
Stitch (stretch stitch/twin needle)
Tip: If your knit curls, use hem tape or starch lightly before sewing.
Step 13: Final Press + Fit Check
Press seams gently
Try it on
If you want a slimmer look, take in the side seams slightly
If you want more drape, leave it relaxed
Styling Notes
A black cardigan with beige piping layered over a dark brown top is a rich neutral combination that pairs beautifully with:
Denim
Cream pants
Chocolate brown pants
Camel/tan skirts
Olive or moss green accessories
Love sewing your own wardrobe?
Browse my Payhip and Hostinger shops for sewing patterns, quality fabrics, and helpful notions to make your next project even easier. You’ll find practical pieces, inspiration, and unique finds for everyday sewing.
Curated Sewing Goods Online – Based in the USA
Reach Out Contact Me
rhonda@theneedlemarket.com
Proudly powered by Hostinger
Start your own site with Hostinger

